
Implementing 802.1x on Wireless Networks with Cisco and Microsoft
Server Setup
The radius authentication server for 802.1x must currently use the Microsoft Internet Authentication Server, since it is currently the only radius server that supports the eap-tls authentication method. FreeRADIUS has support planned for future releases. Successful 802.1x implementation requires the following services on the windows 2000 domain controller:
dhcpd
dns
rras
webserver (IIS)
radius (Internet Authentication Service)
Certificate Authority
Note that these services do not need to run on the domain controller itself with a given network, but a domain architecture is required. In a single server network or for testing purposes having all services on a single server is fine. These instructions assume that you're starting from scratch with an all new network with a newly installed standard Windows 2000 Server - if you're adding support onto an existing network, verify that the settings contained below are compatible and set for your network. Note that some of the tasks must either be performed on a domain controller or using active directory management tools.
Step 1 - Install Windows 2000 Domain Controller
Run dcpromo.exe from the command prompt.
Follow all of the default prompts, ensure that dns is installed and enabled during installation.
Step 2 - Install the required services
Go to the Control Panel, and select the Add/Remove Programs Applet
Select Add/Remove Windows Components from the left side.
Ensure that the following options are selected:
Certificate Services (It will warn you that the computer cannot be renamed and join or leave a domain after installing certificate services. Select Yes to continue.)
From the Internet Information Services (IIS) category, select World Wide Web Server.
From the Networking Services category, select Dynamic Host Configuration Protocol (DHCP), and Internet Authentication Service (DNS should already be selected and installed).

Select Next.
Select the default Enterprise root CA option, and Select Next.

Enter the appropriate information to identify your Certificate Authority, and select Next.
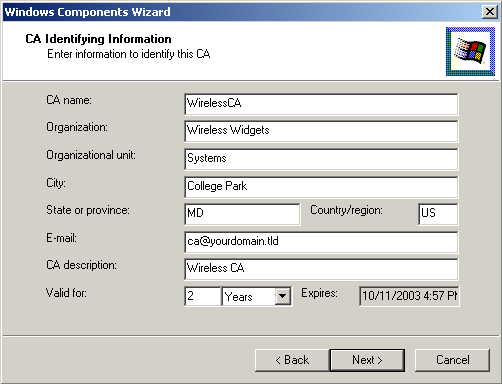
Unless you have a good reason to change the location of the CA's configuration data, select Next.
Installation will warn you that Internet Information Services are running, and must be stopped before continuing. Select Ok, then Finish.
Step 3 - Configure DHCP server.
Click on the Start Button -> Programs -> Administrative Tools -> DHCP
Right-click on the your server as shown, and select New Scope.

Click Next when the New Scope Wizard Begins
Enter a practical name of the scope, and its description, then select Next
Define the ip address range that you want dhcp to hand out to clients. Change the subnet mask as necessary for your ip subnet. Select Next.
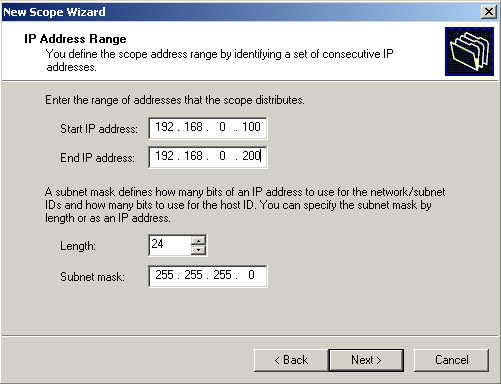
If you want to add exclusions from the address range you've specified, you can do it here. Select Next.
Since wireless clients can be fairly transitory, I typically set a fairly short dhcp lease of 2 hours (the default is 8 days). You can set yours to whatever works for your situation. Select Next.
Its easier to just set the dhcp options now, so select Yes, I want to configure these options now, and select Next.
Enter the router for your subnet, or if this is for a local network only, leave it blank. Select Next.
For the Parent domain enter the domain you entered formerly for the domain controller setup, and enter that servers address for the ip address. Click Next.

Unless you intend to have a WINS server, just click Next at WINS Server address.
Select Yes, I want to activate this scope now, and click Next, then Finish.
Right-click once again on the server, and select Authorize. It may take a few minutes for its status to change.
Step 4 - Setup Certificate Authority
Click on the Start Button -> Programs -> Administrative Tools -> Certification Authority
Right-click Policy Settings under your Certificate Authority server, select New -> Certificate to Issue
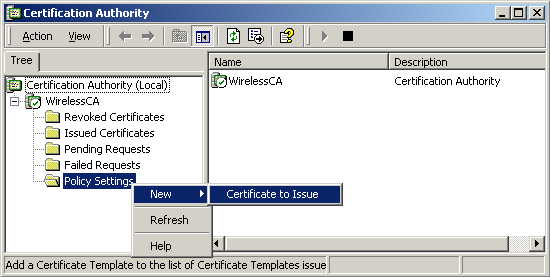
Select Authenticated Session and Smartcard Logon (select more than one by holding down Ctrl key), and Select OK.( IMPORTANT NOTE: I'm sure that that certificate services doesn't need all of the certificates available to be issued, however at this time we aren't precisely sure as to which they are, so for the moment hold down the control key and select all available certificates to be issued. We're working on it.)

Click on the Start Button -> Programs -> Administrative Tools -> Active Directory Users and Computers
Right-click on your active directory domain, and select Properties

Select the Group Policy tab, ensure that the Default Domain Policy is highlighted, and click Edit.

Under Computer Configuration -> Windows Settings -> Security Settings -> Public Key Policies, right-click Automatic Certificate Request Settings, Select New, then Automatic Certificate Request.

When the Certificate Request Wizard comes up, select Next. Select the Computer certificate template, and click Next.

Ensure that your certificate authority is checked, then click Next. Review the policy change information and click Finish.
Open up a command prompt (Start -> Run, type cmd and press enter), and type secedit /refreshpolicy machine_policy . It may take a few minutes for it to take effect.
Step 5 - Setup Internet Authentication Service (radius)
Click on the Start Button -> Programs -> Administrative Tools -> Internet Authentication Service
Right-click on Clients, and Select New Client.

Enter a name for your access point, and click Next.
Enter the IP address of your access point, and set a shared secret. Select Finish.
Right-Click on Remote Access Policies, and Select New Remote Access Policy.
Name the policy eap-tls, and select Next.
Click Add... In this screen you're basically setting conditions of using eap-tls to access the network, and since I don't really want to set any restrictions and a condition is required, I select Day-And-Time-Restrictions, and click Add...
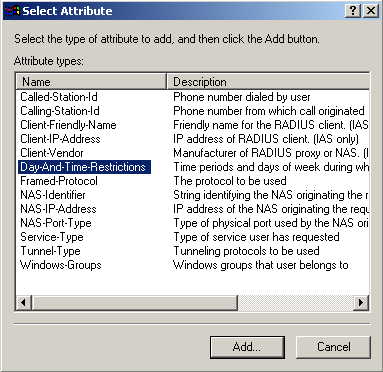
Click Permitted, then OK. Select Next.
Select Grant remote access permission, and click Next
Click on Edit Profile... and select the Authentication tab. Make sure Extensible Authentication Protocol is selected, and Smart Card or other Certificate is set. Deselect other authentication methods listed. Click OK.
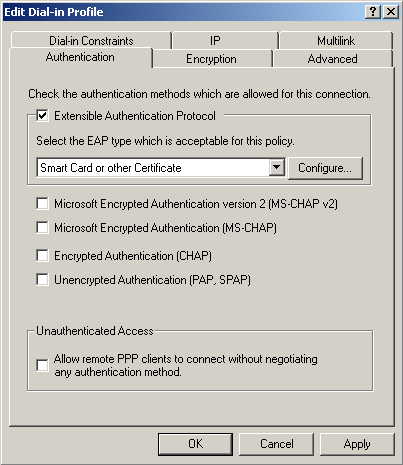
Windows will ask you if you wish to view the Help topic for EAP, select No if you just want to get on with the installation. Click Finish.
Step 6 - Enable Remote Access Login for Users
Click on the Start Button -> Programs -> Administrative Tools, and select Active Directory Users and Computers.
Double click on the user for which you want to enable authentication to bring up its account properties.
Select the Dial-in tab, and select Allow access. Click OK.

Setup of the Authentication Server is finished, now set up your client ...
This how-to is still under development, comments,
questions, problems and feedback welcomed at mvanopst@cs.umd.edu
Last updated January 28th, 2002 by Mike van Opstal